By Bec Morris
Why are record-triggered flows important? Well, they are ultimately automations that update records in the background, making it easier to keep all related information up-to-date.
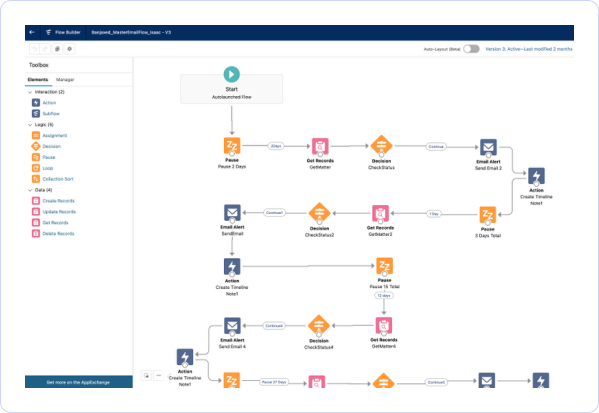
To start the process, visit Salesforce Setup and under the subcategory Process Automation, click on Flows. In the top right, click on “New Flow.” Of the five options for a new flow, choose “Record-Triggered Flow,” which is activated when records are created, deleted or updated.
Today, we’ll be using an auto-layout flow format, which is still in Beta testing, but aspires to make creating flows more intuitive and user-friendly.
In the Object category, enter “Matter,” and set the trigger to run the automation when records are updated. Make sure to limit the condition requirements to activate the flow only when all conditions are met, making sure it doesn’t update needlessly.
The first condition should indicate an intake is null when the value is “{!$GlobalConstant_False}”.
It is essential to ensure that the field “When to run the flow for updated records” will activate every time a record is updated and meets the condition requirements. If you only run the automation when a record is first updated to meet condition requirements, additional updates may slip through the cracks.
Make sure the flow is optimized for Actions and Related Records, then click done.
Now we have the conditions that trigger the automation, so it’s time to start on the actions we want this flow to perform. Beneath the Start object, click the plus sign to add a new element to the flow.
Of the options presented, scroll to the data section and select “Get Records,” which will allow you to find Salesforce records and store their field values in flow variables. For this example, we want to find all Roles, labeling the action accordingly.
The most important step here is to choose which Object records to retrieve. Query “Roles” in the Object drop-down and filter the Role Records as “All Conditions Are Met (AND)” then add your limiting variables, such as categories and subtypes.
We used the first field to indicate that the Matter ID on each role must Equal the same ID as the Record. The value will appear as “$Record > Record ID.”
Under Sort Role Records, indicate if you want to store only the first record or all records. Since we want each record to be updated accordingly, we store all records with all fields, though this can be customized further. Click done, and it’s on to the next step.
Add a new element beneath the Get All Roles action we just created to make a “Loop for Roles.” This allows the automation to run separately for each role in succession. Select the plus sign beneath the loop that indicates “For Each,” and create an update records action.
Indicate which field you wish to update in the Label, then set the fields values for the Matter record. Make sure to indicate the current item “[!Loop_for_Roles.}” and select which value you wish to update.
Then, simply save the flow, and you have made your life that much simpler with a record-triggered flow that updates your records for you while you focus on what really matters- helping your clients.
Want to learn more about going with the Flow?
Take a look at these flow-related video tutorials and blog posts.